
A hatched (slash) pattern gives your artwork a slick feel. Here’s an easy way to make one in Photoshop.
- Create a new canvas (File → New). Set both Width and Height to 6 pixels.
- Open the Layers panel (Window → Layers). Delete the existing background layer so the canvas is transparent.
- Zoom all the way in to 3200% with the Zoom tool (magnifying glass) in the toolbar. Draw a diagonal line with the Pencil tool, like below.

Feel free to customize it with different colors, directions and even sizes, like 3 x 3 pixels or 2 x 2 pixels. You can also download the PSD here:
Application
- Continue with what you have, or simply open the PSD above.
- Go to Edit → Define Pattern and name your pattern as you like. That’s it for defining the pattern — now let’s apply it to an image.
- Place an image with a transparent background (File → Place; “Place Embedded” in current versions of Photoshop). I placed a chocolate donut PNG.

- Create a new layer (green arrow on the right), fill it with any color you like (I chose white) and drag it below the donut layer.
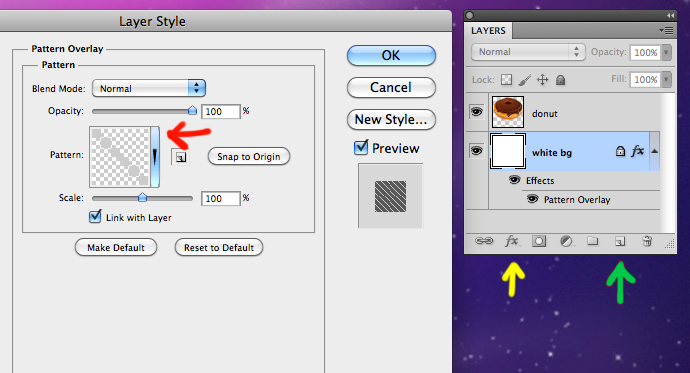
- Add a layer style to that background layer (mine is “white bg”) by clicking the “fx” button (yellow arrow above). In the Layer Style window, choose “Pattern Overlay” and pick the hatched / slash / diagonal pattern you made from the pattern picker (red arrow).
Final result: